Loading...
视频通话-UI模式
本页将介绍如何使用 XYRTC SDK 进行集成多人音视频通话到你的小程序项目之中。在开始之前,请确认您已经完成相应的准备工作。
安装SDK库
参见下载模块,安装小程序SDK库;
时序图
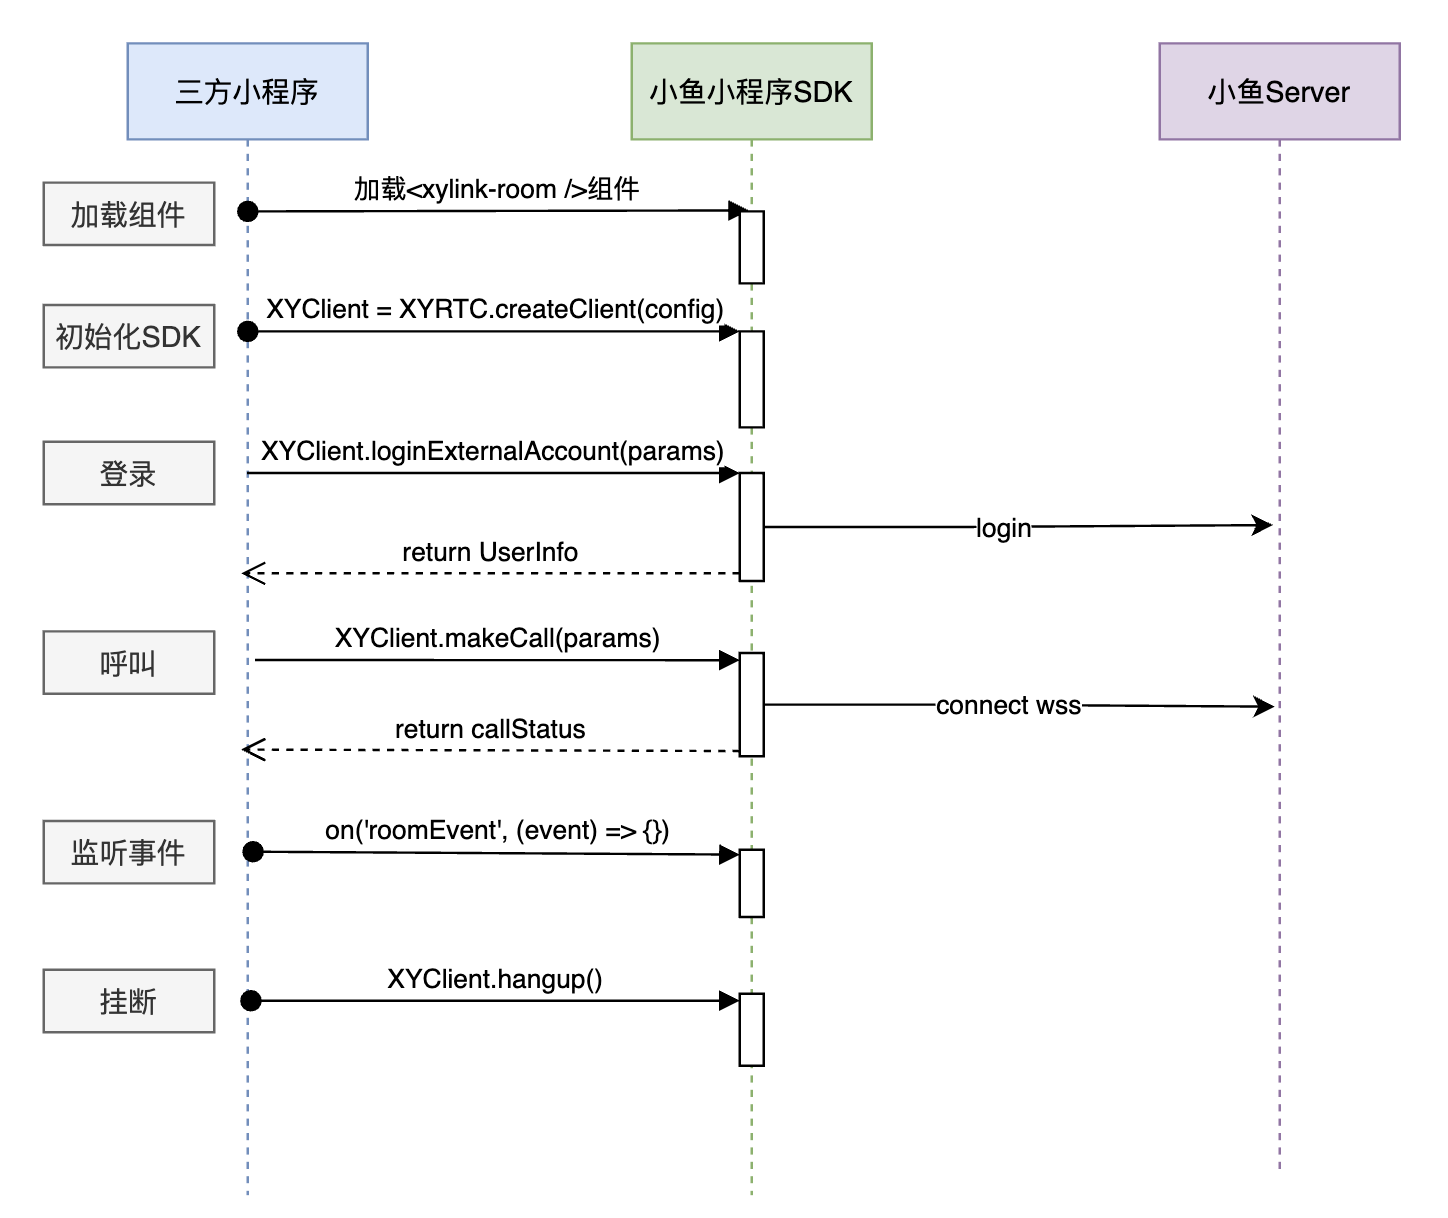
基础流程引导
1. 在 json 文件中配置使用组件
配置页面:
// index.json文件中添加组件引用和横屏配置:
{
"usingComponents": {
"xylink-room": "@xylink/xy-mp-sdk/component"
},
"pageOrientation": "landscape",
}
2. 在 wxml 文件中使用组件
在 wxml 文件中使用 组件,组件中的配置变量请参见步骤四:
// index.wxml文件中使用组件

<!-- 小鱼小程序SDK UI组件 -->
<xylink-room
  template="{{ template }}"
  beauty="{{ 5 }}"
  muted="{{ muted }}"
  camera="{{ camera }}"
  devicePosition="{{ devicePosition }}"
  id="xylink"
  bindonRoomEvent="onRoomEvent"
/>
3. 在js文件中创建SDK实例
在会议页面js文件中添加如下代码:
// 引入SDK
import XYRTC from "@xylink/xy-mp-sdk";


Page({
  // 页面加载时触发
  onLoad() {
    // 创建client实例,保存到当前页面的实例上,后续需要调用client内部的方法
    this.XYClient = XYRTC.createClient({
      //...
    });
  },
})
4. 在 Page 中定义 data 属性
Page({
data: {
muted: false,
devicePosition: 'front',
camera: true,
onHold: false, // 是否通话等待
template: {
layout: 'auto',
detail: []
}
}
}
5. SDK登录
在页面加载阶段或者事件触发,进行SDK企业账号登录:
this.XYClient.loginExternalAccount(params: LoginExternalAccountParams): Promise<StatusInfo>;

/**
 * 登录参数
 *
 * @property { string } extUserId - 第三方UserId,规则:数字、字母、\_-, 且长度不能超过 50字符
 * @property { string } displayName - 登录用户名
 */
interface LoginExternalAccountParams {
  extUserId: string;
  displayName: string;
}

/**
 * 登录结果信息
 *
 * @property { string } key - 错误码
 * @property { string } message - 消息提示
 * @property { IUserInfo } data - 登录用户信息
 */
interface StatusInfo {
  key: string;
  data: UserInfo | null;
  message: string;
}

/**
 * 用户信息
 *
 * @property { string } appId - 应用ID
 * @property { string } callNumber - 用户呼叫号码ID
 * @property { string } deviceSN - 设置SN
 * @property { string } displayName - 登录用户名
 * @property { string } enterpriseId - 登陆企业ID
 * @property { string } securityKey - 安全码
 * @property { string } userId - 用户ID
 */
interface UserInfo {
  appId: string;
  callNumber: string;
  deviceSN: string;
  displayName: string;
  enterpriseId: string;
  securityKey: string;
  userId: number;
}
6. 发起呼叫
发起呼叫,呼叫如果成功后,需要监听connected事件确认加入会议成功;
this.XYClient.makeCall(params: MakeCallParams): Promise<StatusInfo>;

/**
 * 呼叫参数
 *
 * @property {string}  string - 云会议室号
 * @property {string}  password - 云会议室入会密码, 默认填写为""
 * @property {string}  displayName - 入会名称
 * @property {boolean} isAudioMute - 关闭音频入会
 * @property {boolean} isVideoMute - 关闭视频入会
 * @property {CameraPosition}  cameraPosition - 前置或后置摄像头, 可选值:front,back
 */
interface MakeCallParams {
  number: string;
  password?: string;
  displayName?: string;
  isAudioMute?: boolean;
  isVideoMute?: boolean;
  cameraPosition?: CameraPosition;
}

/**
 * 前置或后置摄像头
 *
 * @property  FRONT front - 前置
 * @property  BACK back - 后置
 */
enum CameraPosition {
  FRONT = 'front',
  BACK = 'back'
}

/**
 * 返回结果
 *
 * @param { string } key - 错误码
 * @param { any } data - 数据
 * @param { string } message - 结果消息
 */
interface StatusInfo {
  key: string;
  data: any;
  message: string;
}
7. 监听事件
组件内部的状态会通过组件事件上报给业务层,需要在 Page 中定义需要绑定的事件函数:
onRoomEvent(ms) {
  const { type, detail, message } = ms.detail;

  switch (type) {
    case 'connected':
      // 入会成功消息
      console.log('demo get connected message: ', detail);

      // 加入会议成功,隐藏呼叫Loading
      this.setData({ meetingLoading: false });
      break;
    case 'disconnected':
      // 退出会议消息
      console.log('demo get disconnected message: ', detail);
      // 挂断会议
      this.XYClient.hangup();
      // 提示并退出会议页面
      break;
    // 其他监听消息
    default: {
      console.log('匹配到ws消息', ms.detail);
    }
  }
}
8. 完成集成
此处可能注意到整个集成没有涉及到画面和声音已经会议布局的处理,是因为小程序SDK提供了UI模式下的自动布局和自定义布局,默认是自动布局,当参会者加入会议后,所有的画面和声音处理已经在<xylink-room />组件内部完成,开发者无需处理,仅需简单的几个步骤完成会议功能的开发;
上述步骤包含了部分示例代码中的函数,详情见SDK示例程序;
意见反馈